
Creating music is an art, and is not just one set of skills, it would be way easier if it was. Instead, it requires a producer to be comfortable with learning or in some cases handing a track over to other people to do some of the processing. This is especially true in the final stages of a track’s creation so in this article, we will cover what is the difference between audio mastering and mixing.
The main difference between mixing and mastering is that Mixing focuses on individual channels while Mastering adjusts the track as a whole. A mix engineer will tweak the effects and frequencies of channels (also called stems) to make sure that everything can be heard clearly and suits the overall “feel” of the track. A mastering engineer will treat the track as a whole and, amongst other things, make it as loud as possible (within industry standards) without distorting.
To give you a full understanding of the process I will cover both individually and also give you the main differences.
What Is Mixing?
Contents

Audio mixing is the art of taking multiple channels (also called stems) and then blending them into one clear and cohesive audio track.
When you have different elements of a track, like drums, bass, and melody they can’t all be at full volume and fighting over the same frequencies. Doing so is what leads to a cluttered muddy sound and it’s a mistake that many inexperienced producers will make when mixing.
Mixing is the arrangement of the sounds that help create clarity in your track and gives music its depth and dynamics.
An audio mixer’s goal is to blend sounds and turn them into a soundscape that matches the feel that the producer was going for. So rather than a cacophony of sound hitting a listener, they are able to pick out individual elements as well as hear the track as a whole.
Mixing is about getting all the parts in the right place. For example, when listening in headphones, bass, or heavier elements may sound like they’re coming at you, down the center. Whereas drums may be panned off to the left or right.
This allows your ears to pick out, and process, the individual elements and make a track sound expansive.
Think of it between the difference of five people shouting at you from the same place compared with having those people placed in different places and tweaking each person’s volume so that each can be heard, or ‘tuned into’ individually.
What Tools Are Used for Mixing?
To create a professional mix an engineer will use various processes, these include:

EQ
- All sound is made up of frequencies, which is measured in hertz (Hz).
- EQing is all about boosting or reducing specific frequencies to give room to everything within a track and make each sound sit within a mix.
- You will also hear EQs referred to as highs, mids, and lows.
- Heavy sounds, for example, are in the low-frequency spectrum.
- Whereas melodies or cymbals are often in the mid to high-frequency range.
- It is EQing that allows the separation of frequencies that allows your ears to process and hear every single element.
A Note on Frequencies
All sounds will register across the entire frequency scale. So even a tinny sound will still have some element on the lower scale. It’s this that makes a sound whole. Imagine, when listening to a bass-heavy track through a phone speaker. Phone speakers lack the lower bass frequencies and that is because those frequencies are missing that a track will sound empty or tinny.
Therefore, an engineer will selectively give room to other sounds in the arrangement. Sometimes you’ll reduce the EQ on one channel so that it allows another to breathe.
For example, if you have a vocal line of a certain frequency, you might turn down a similar frequency in the melody line. This allows the vocals to cut through the melody and be the main focus of the track.
Compression
- Compression is used to control the dynamic range of a track.
- The dynamic range essentially means the difference between the quietest part of the track and the loudest.
- Therefore, compression is used to make sure that:
- The loudest parts don’t shock the listeners, or worse, pierce your ears, when they drop.
- And the quieter parts aren’t so quiet that they simply get lost.
- Compression is about finding the balance between a consistent, audible volume and still having a dynamic range.
- Because, of course, without dynamics then a drop wouldn’t have the same impact if it wasn’t for the quieter parts.
- Using compression is a fine line. Too much of it and it can actually make the track lack any sort of punch. As any dynamic feeling to the track can be compressed out.
Reverb
- Reverb helps develop the spatial feeling of a track.
- Imagine an instrument that was played recorded clean into a computer. By adding different types of Reverb you can make it sound as if it was being played in a small room, or a vast concert hall for example
- When applied to samples or MIDI instruments, reverb can make them sound more ‘live’, rather than being computer-generated notes.
- As with Compression, using Reverb is all about finding a nice balance.
- Often erring on the side of subtlety will produce a more convincing sound than overloading individual channels with reverb.
Panning

- Another key factor of adding some space to your track is panning certain channels to the left and right.
- In its most basic terms, panning can make it sound like instruments are being played in separate parts of a room.
- With electronic music specifically, it is used to separate sounds and give a more spacious feel to your track.
Mixing Takeaways
- Mixing helps take the individual elements that make up a music track and create space for everything to breathe and be heard.
- This is done by adjusting the levels of individual channels, panning, and applying effects (such as EQ, Reverb, and Compression).
- These can all be automated throughout the track.
- This allows elements like the bass, or melody, for example, to have their volume dropped slightly lower for parts of the track where they are not the focus, then brought back up when they are the focal point.
- Once a mix engineer (or you) has finished they will output a file known as a mixdown. This is the last thing that’s done before, mastering a track.
What Is Mastering?

Mastering is the final step in the audio production process and takes place immediately after mixing the track.
The primary aim of mastering is to balance the track, ensure a good dynamic range and make it sound consistent across different quality speakers and formats.
Mastering is the final chance to remove or fix any mistakes. For example, clicks or hisses, that may have been missed during the mixing stage, can be removed.
In terms of producing an album, mastering ensures consistency across multiple tracks. Meaning that when the album is played the listener can set the volume once not touch it again for the entire album. Even if there are heavier and lighter tracks on the album there will be a consistent volume.
Mastering is all about bringing everything together and making it sound as polished and clear as possible.
There is a fine balance in mixing between making a track as loud as possible (within the accepted standards), while also retaining some dynamic range in the track. After all, you still want the quieter, subtle parts of music as they serve to make a more powerful impact when the drop hits.
What Tools Are Used for Mastering?
Although a mastering engineer uses similar tools to a mix engineer, they use them in a different way and with different end goals in mind.
Mastering Tools Include
EQ
- During the mastering stage, EQing ensures that all the frequencies play nicely together.
- The aim is to make sure that nothing stands out too much to the point of piercing a listener’s ears or breaking up the flow of a track.
Compression
- When mastering, the engineer will compress and level a mix to ensure there is not an uncomfortable difference between the quietest and loudest parts of the track.
- You may have experienced this when you listen to a track or a badly mixed movie soundtrack.
- You find you have to turn up because the vocals (for example) are too low… then when a drop happens (or an explosion in the case of a movie) it is uncomfortably loud.
- This is because the audio has not been processed and compressed properly.
Limiting
- During mastering, the engineer will add an upper ceiling to the track’s volume i.e making it as loud as possible within the confines of industry standards.
- This is so that when a DJ is using the track in a club, for example, it will be at a similar natural level to all other tracks within the mix. Although of course, the DJ may adjust it on their mixer.
- The limiter also ensures that no one part of the track blows out the sound and causes the final product to distort.
Stereo Enhancement
- Stereo enhancement is the finalization of balancing the track in the left and right speakers (or headphones).
- It helps make the soundtrack sound wide and expansive, while also adding space to the overall sound.
- The main aim of this, aside from giving elements within the track clarity, is that it helps a listener feel as though they are in the music.
- This then creates more of an immersive experience for them.
Why Is Mastering Called Mastering?
The name ‘mastering’ comes from the idea of producing a master copy from which all other copies will be generated and distributed to the various streaming services, or printed to CD and vinyl.
Mastering Takeaways
- Mastering is the final stage in the creation of a professionally released song.
- It makes sure a track will sound consistent across all varieties of speakers and formats.
- When putting together an album, mastering ensures that all tracks have a consistent volume.
- All commercially released tracks will have been mastered, it is what makes a track sound complete and polished
- Mastering a balance between compressing audio without squashing out the dynamic feel and range of a track. When this happens a track sounds flat.
- The name ‘mastering’ derives from creating a ‘master copy’ from which all other versions are duplicated.
Now that you know in detail what each process does and why mixing and mastering are separate jobs with different skills. Let’s summarise…
What Is the Difference Between Audio Mastering and Mixing?
The mixing process crosses over a lot with the actual producing stage of the track’s creation. A mix engineer can and will tweak individual channels, instruments, and effects in order to balance the track and then instill emotion or a feel into it. This is the basis from which a Mastering Engineer will work from.
Mastering engineers do not have access to individual channels etc and will instead process the entire song as one file. It is their job to get the best out of the mix and make the track stand up against all other professionally mastered/released songs (like on a radio playlist or in DJ mixes).
Although they use similar tools to each other the aims are different. A mixing engineer aims to make sure all the instruments and channels sound clear and play nicely together. A mastering engineer’s job is to look at the track as a whole and make decisions about what will make it slick and finished.
Think of it like a rocket ship, mixing pulls all the parts together and makes sure it works. Mastering does the last round of checks and processes and makes sure it’s finally ready to launch.
More on Mixing
Tips for Mixing
Consider the Mix While Producing
The mixing process actually begins while you are producing the track itself. You will have an idea in your head of how you want the track to sound i.e either loud and in your face or perhaps ambient and spacey,.
Therefore you should use sounds that convey that mood right from the start and in all likelihood, you will do elements of mixing as you develop the track.
So have a clear idea of the feel that you want your track to have while producing. By choosing the right sounds during the production phase means there is less to fix in the mixing process later.
For example, it would be hard to make a bassline sound ambient and spacey in the mixing phase. You’d be better off using ambient sounding bass all along. Which will then cut down the tweaking and processing that has to be done by the mix engineer (or yourself).
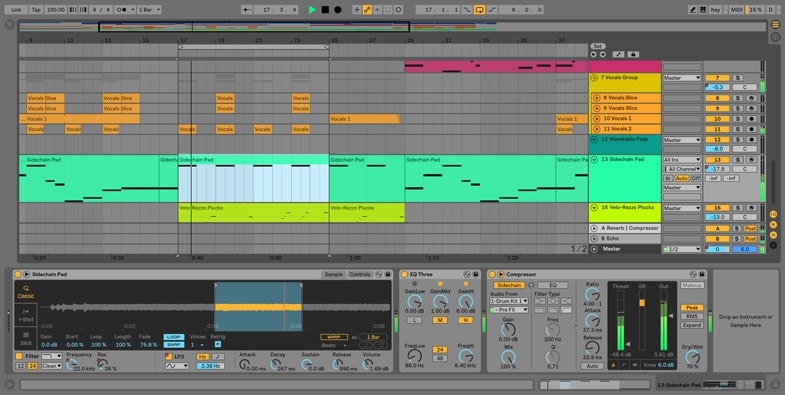
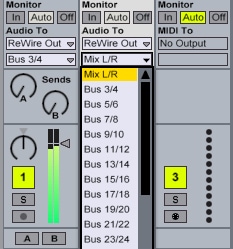 Use Buses
Buses is essentially a fancy name for grouping tracks together so you can treat them all as one, all DAWs such as Ableton include them.
Instead of adding reverb to every individual channel that has drums, for example, you can pipe all drums to one bus and then apply Reverb just to that bus.
Using buses not only cuts down on time and ensures consistency across channels but is also designed to reduce CPU load on your computer. For example, if you have four tracks of drums with duplicate effects, then that is four sets of effects, doing the same thing, draining your CPU. Instead, pipe the four channels to one bus and apply the effect there, then your CPU only has to run one effect.
Level Your Levels
It’s not a good idea to have all of the elements of your track at full volume all of the time. Otherwise, all the elements will be fighting for the attention of the listener all the time. Not to mention that this can cause clipping and distortion.
So work out the levels for each section of the track. Perhaps drop the bass a little to let the melody come through or vice versa. Doing so will depend on what you want to be the listener’s focus at that particular time.
A simple example of this would be the main focus of a track being the vocals, which then switches to the melody line when the vocals drop out.
By controlling the levels of your individual channels you also create space within your track, known as headroom for the mastering engineer to do some mastering after the mixdown.
What Is Headroom in Audio?
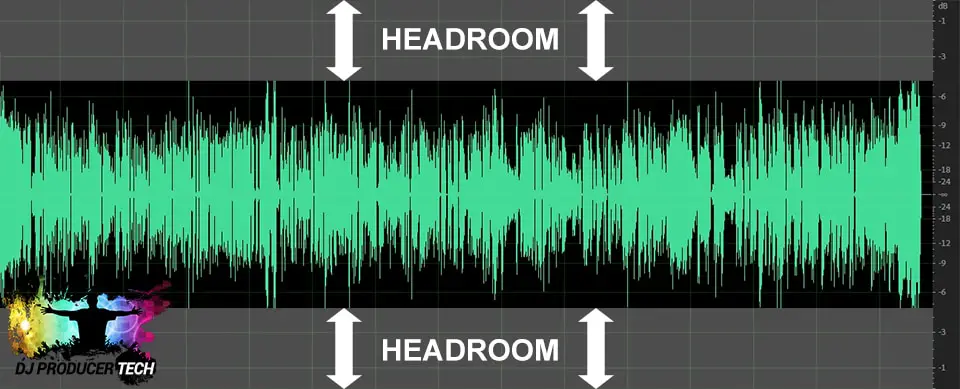
When mixing a track a producer needs to leave some space below the final volume level (measured in Db) for the mastering engineer to adjust and process the track.
Put another way, it is the measure between the loudest part of your track and 0db (which is the peak in audio terms). Typically this will be in the 3-6db range to allow the engineer to make any necessary changes that may affect the final volume.
Automation
Automation is simply being able to map how controls, effects, or levels change during certain sections of the track.
A simple example of this would be a fade-out. This is simply an automated volume knob on your DAW that is equivalent to you sitting and turning the volume knob down very slowly. All DAWs allow you to draw in your automation, allowing for very smooth and accurate adjusting of effects and volumes,
The Pan Plan
Adjusting the panning (i.e moving sounds left or right) of elements of your track controls the width and spatial feel of your track.
As a general rule, keep heavier sounds (like bass and kick drums) centered and then work around them.
If you have everything centered, it will make your mix sounds cluttered, or worse, flat and dull.
By panning elements like drums or melody lines off to the left and right makes your listener feel like they are in the music, instead of it just being blasted at them.
Use a Reference Track
A pro tip to make your mixes sound more professional is to find an existing track that you like the sound of.
Place this on a spare channel within your DAW and listen to how they have panned or effected certain elements like the drums or the melody line..
By using the track as a reference, you will be able to compare and mix your track in a similar way. This will give your track more of a professional sound as you have a point of reference of how a professional mix engineer mixes their tracks.
Don’t Be Afraid to Experiment
The key to good mixing is experimentation, as there is no perfect set of rules that are guaranteed to make your track sound right. Every single track is unique and has a different feel for it.
So use a reference but also trust your instincts. After all, it is your track and it should sound right to you, as only you know the sound and feeling that you are aiming for
Mixing Takes Practice
Like with anything, mixing takes practice so don’t be afraid if your early track mixes sound terrible. The more you practice and repeat the more naturally you will be able to mix.
In fact, I would suggest actively keeping copies of every track you ever mix so that you can go back and listen to them. Trust me when I say you will notice the improvements the more experienced you get.
Mixing Is Not Separate to the Creative Process
Mixing should be seen as part of the creative production process, not a separate entity.
For example, you may find that when you come to focus on mixing, you realize that perhaps a bassline works well only in certain sections. While in others it may muddy the overall sound and pull focus away from other elements of the track.
So don’t be afraid to remove parts that you find suddenly don’t work. See mixing as part of the creative process of writing, not some kind of chore that has to be done after the production phase.
Should I Mix My Own Music?
You should absolutely learn to mix your own music, even if the first several attempts don’t come out the way you imagine you will be improving all the time. Mixing it is an art in itself and another skill to add to your arsenal.
Creative Mixing
There’s also an opportunity to be creative with it. You are in a different mindset when you are mixing a track and it helps you hear things in a new light and pick up on parts that perhaps don’t work as well as you might have thought during the producing stage.
The more you develop the skill of mixing, the more you will be able to put into reality the song that you have imagined in your head.
Even if you get to the stage of employing a professional mix engineer, by giving them a rough mix that you’ve done yourself, they will have a clear idea of the feel that you had in mind for your track.
Separating Mixing & Producing
As a way to separate the producing and mixing phases (even though you would have done elements of mixing while producing the track) it is advisable to export your stems and put them into an entirely new session.
Not only does this help you focus on the mixing stage but it also removes the temptation of endlessly tweaking the track or rearranging things. By exporting your stems/channels to mix in a different session you are committing to the track as you have created it so far.
Rest & Reset Your Ears
Another way to split the mixing and producing stage stages is to wait until the next day before actually starting to mix your track. The main reason behind this is that it allows your ears to rest and reset. So again, you’ll be able to approach your track with fresh ears and be able to hear things clearly.
You’ll find that you’ll pick up on things that you otherwise might have missed after several hours deep in the production process.
Speaker Testing
One important part of mixing is testing your track on a variety of different speakers on everything from your phone speaker and car stereo through to professional studio monitors. This again helps you improve as a mixer and as a producer.
This is because you will be able to hear which parts of the track, or individual sounds, don’t work well when comparing different sound systems and speakers.
Why You Should Mix Your Own Tracks
Even if you do plan to use a professional mix engineer, I would suggest it’s always worth mixing every single track that you produce. Any skills you learn during the mixing phase will only ever improve your skills as a producer as well.
How Do You Prepare Your Songs for Mixing by a Professional
When sending your track to be mixed professionally it is advisable to carry out some housekeeping on your track. This is to make the work as easy as possible for the mix engineer.
You want them to be working on the mix itself rather than having to spend time cleaning up or organizing your session.
To prepare your songs for professional mixing
- Export out each channel/stem separately and name them properly
- This allows the mix engineer to quickly drop them into a new session and get working on your mix.
- Be descriptive with your naming
- So rather than naming your tracks, simply drum 1, drum 2, bass 1, etc, you can go a step further and be as specific as possible with the instrument i.e Hit Hats, Kicks, Saw bass, Reese bass.
- The more descriptive and accurate your naming conventions are, the more time the engineer is able to spend actually mixing your tracks, rather than familiarizing themselves with your stems each time.
- No effects (on your master)
- While it is okay to have effects applied on an individual track (something you probably will have done during the producing phase), make sure that there are no master effects applied (i.e effects applied to the track as a whole).
- This would be because it is the job of the mix engineer to apply overall effects in order to achieve the feel for the track that you have imagined.
- Export all stems/channels at full length
- Don’t just export individual sounds clipped to their actual length.
- For example, if you have a single whoosh sound that appears at one minute in, export that channel with the minutes silence before the sample, not just the whoosh itself.
- Doing so allows the mix engineer to drop everything into channels and have all of the sounds appear at the right point in your track.
- Even if the mix engineer is willing to spend time making sure samples are in the right place, you will actually be wasting your money by paying for their time to do so.
- Instead, you only want to be paying for their time to actually mix your track.
- The easiest way to do this is to export all stems/channels from the beginning to the end of your track.
- To use the example of the whoosh again. It might have one-minute silence before it, followed by another two minutes of silence (until the end of the track). Simply export out the entire thing.
- Don’t just export individual sounds clipped to their actual length.
- Export all audio at the rough volume that you would like your final track to be
- This gives the engineer an idea of the type of levels and feel that you want from the final mixdown.
- That said, be sure to leave some headroom in your track for the mix engineer to do their processing.
- Just to remind you, headroom means simply reducing the overall volume of the track and leaving between 3-6 decibels of room before 0dB.
- Even if the mix engineer does not require the headroom, they can always boost the overall volume of your track.
- Absolutely no peaking
- Before exporting, ensure that none of your channels are peaking or hitting anything higher than -3dBs (the minimum recommended headroom).
- Anything that peaks, or is too loud in general risks affecting the quality of the final output.
- In the worst case, any channel that is peaking may be distorted beyond repair.
- Export all files as WAV or AIFF
- These are full quality audio files with no compression or data loss.
- Whatever you do, do not export as MP3s as data and quality is lost during export, which will again degrade the quality of the final track.
- Provide a reference
- To give the mix engineer a clear idea of the type of sound and spatial feel you want for your track it is always wise to include a reference for them to listen to.
- This should be a professionally engineered track that you like the sound of.
- By doing this, the engineer is able to compare their mix to your reference track so it is much easier for them to realize the final mix that you have imagined in your head.
More on Mastering
Is Mastering Necessary?
Mastering is a vital part of the music production process. This is because all professionally released music has a standard volume level and quality.
Tracks need to be processed in a certain way to ensure that they sit comfortably within things like a DJ mix or a radio station roster. If you have had any amateur DJ mix and one particular track sounds weaker than everything else, it’s because it has not been mastered or, at least, has been done poorly.
A lot of work goes into creating music, but it is the last 10% of effort of mastering a track that makes it sound complete, professional, and ready for commercial release. Record labels that pick up an already finished track will still always send it to their mastering house before ever thinking about releasing it.
What Next?
- Want to know how to make money as a DJ so you can get your tracks professionally mixed & mastered? Then this is the post for you.